
The jacket takes almost all the attention when someone buys their first kit, and yet it's the trousers that work hardest: they're the garment that spends the day pressed against the chairlift, that takes the snow when you sit down, and that meets the sharpened edge of a ski or board every time you cross your legs. Badly chosen trousers show up sooner than a badly chosen jacket. This guide is about getting it right, and about a handful of details at the hem that almost nobody looks at and that separate trousers lasting five seasons from trousers lasting one.
In short: decide the format first — ordinary trousers if you value comfort, bibs if you sit in the snow a lot or snowboard, a one-piece only for extreme cold — and then look at the hems: an elastic inner gaiter, a boot hook, and edge-guard reinforcement on the inner ankle. Look for more water column than in your jacket, because here you sit on it. And if you're going to wear impact shorts underneath, allow for them when picking a size.
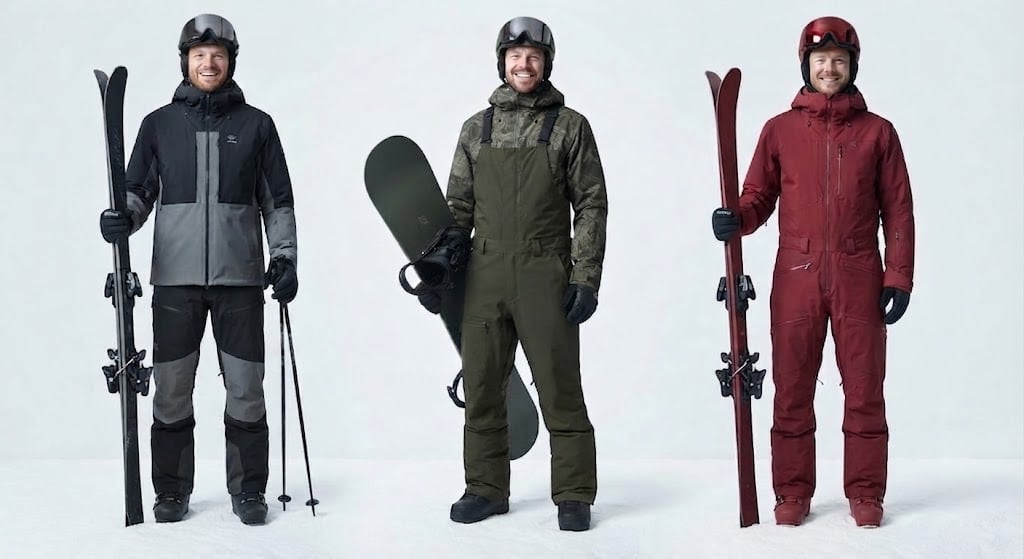
Trousers, bibs or a one-piece
| Format | Snow at the waist | Going to the toilet | Warmth | Who it's for |
|---|---|---|---|---|
| Trousers | Depends on the jacket's powder skirt | Easy | Normal | Piste skiing, general use. |
| Bibs | Can't get in | Middling | Slightly more | Snowboarding, freeride, soft-snow days. |
| One-piece | Can't get in | Awkward | The most | Extreme cold and not much else. |
Ordinary trousers are the default and what we'd recommend to most people: more comfortable, easier to get on and off, more versatile. Their weak point is the waist, and there it depends on the jacket having a powder skirt.
Bibs come up over your waist with braces. They're the best solution to the snow problem, because there's no join to seal: nothing can get in even if you fall backwards. Which is why they're so popular in snowboarding, where you sit in the snow constantly. In exchange they're slightly less comfortable, and you have to half remove your jacket to use the toilet; look for a long side zip, which solves a good part of that.
A one-piece covers you from ankles to neck in a single garment. It's warmer than anything else and seals completely, but it's the most awkward to put on, take off and regulate: if you're too warm at midday, you have no margin. It makes sense in extreme cold or high mountains; for a normal day on piste it's more garment than you need.
One note to avoid confusion when searching: in snow clothing "bib" means trousers with braces, whereas in protective gear "body armour" is a torso protector. Two different things; we cover the second in the guide to ski and snowboard protection.
The hems: where good trousers are decided
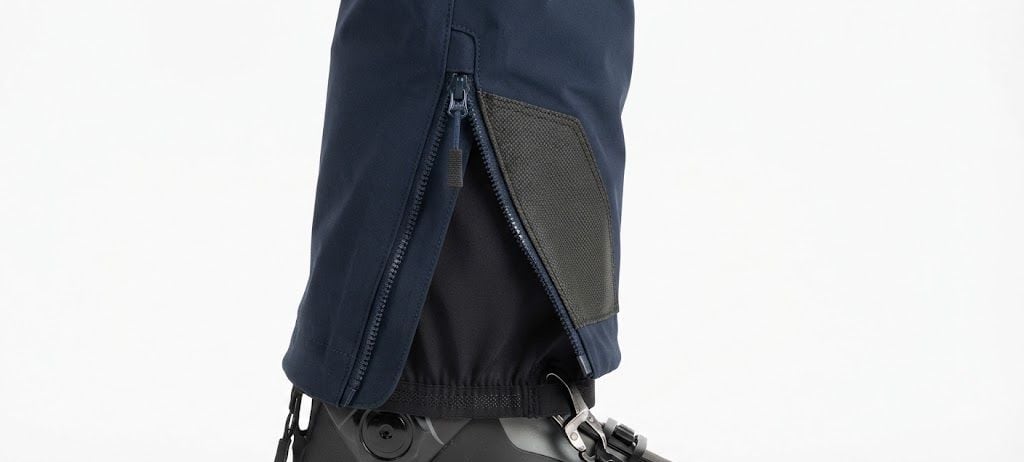
This is the section that genuinely separates technical trousers from ones that only look the part, and the one almost no guide explains. Four details, all in the last twenty centimetres of the garment.
- Inner gaiter: an elastic cuff inside the hem that sits over the boot, not inside it. It's what stops snow getting in at the ankle when you fall or walk through deep snow. If a pair doesn't have one, rule them out.
- Boot hook: a clip, usually with a non-slip rubber band, that holds the gaiter to your boot lace or buckle so it can't ride up. It looks like a minor detail until the day you walk through knee-deep soft snow.
- Edge-guard reinforcement: a panel of much tougher fabric on the inner face of the ankle. It's there because the edge of a ski or board is sharpened like a knife, and when you cross your legs or fall it cuts ordinary fabric without any effort at all. It's the number one reason trousers get ruined.
- Hem zip: opens the leg so you can get your boot through without a fight. Very welcome with ski boots, which are big and rigid.
Insulated or not
The same decision as with the jacket, and the same answer for most people.
- Non-insulated (shell): just the waterproof layer. You regulate the warmth with what you put underneath, so the same trousers work in January and in April. It's what we'd recommend if you ski with any regularity.
- Insulated: filling stitched inside. More convenient — put them on and go — but with no margin: the day the temperature climbs, it's too much.
Legs generate a lot of heat and get cold less than your torso, so insulation is needed considerably less in trousers than in a jacket. If you're unsure, go non-insulated and add a thermal base layer on cold days. The filling materials — PrimaLoft, Thinsulate, Thermore — and how the layer system works are in the layering guide.
Waterproofing: it matters more here than in the jacket
This is the point most people miss when buying a set, and it has a simple physical explanation.
The water column measures the pressure the fabric holds before letting water through. Sitting on the chairlift or in the snow, your own weight compresses the fabric and multiplies that pressure, something that never happens to your jacket at any point in the day. Which is why trousers need the same or more water column than the jacket, never less — and it's a common mistake to buy a set where the trousers are the poor relation.
As a quick reference, from 10,000 mm you're fine for normal use on piste. The detail of the figures, how they're measured and what they mean is in the layering guide.
On seams the same applies as with the jacket: what matters isn't that it says "taped" but whether all of them are taped or only the critical ones. On trousers, the seat and crotch seams are the ones that feel it most. We explain it in the jacket guide.
Ventilation
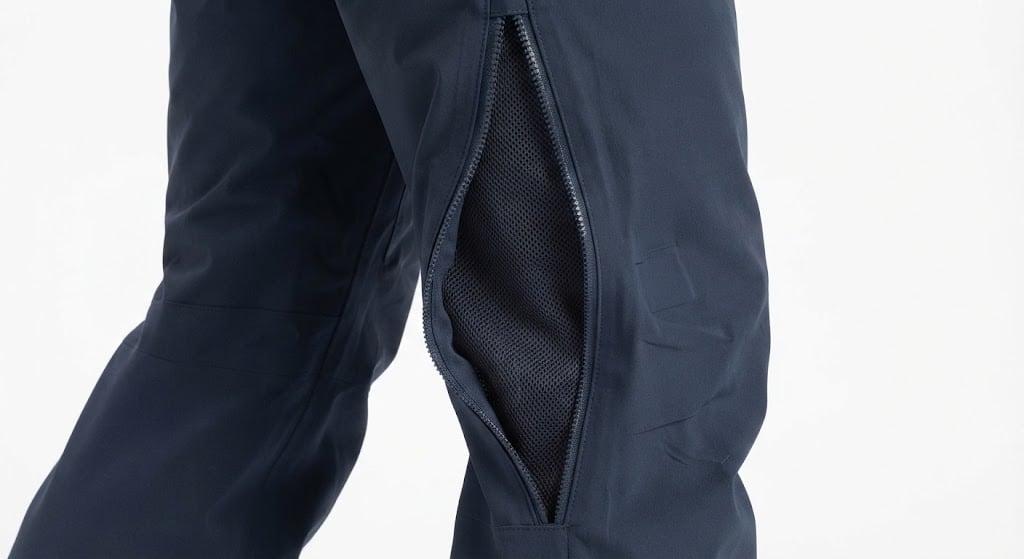
Ventilation zips on trousers run along the thigh or the inner leg, and many have mesh behind them so snow can't get in while they're open.
They count for more than you'd think. Legs are the engine of both sports and generate a lot of heat, and a sunny spring morning will genuinely make you sweat. If you're torn between two similar pairs, take the ones that have them: they regulate far faster than any membrane.
Waist, braces and fit
- An adjustable waist, with velcro or side tabs. Essential: with layers underneath your waist changes from one day to the next.
- Detachable braces on some trousers, which give you a good part of the bib's advantage without its drawbacks.
- Tabs to attach the trousers to the jacket on some sets from the same brand, which seal the waist without going as far as a bib.
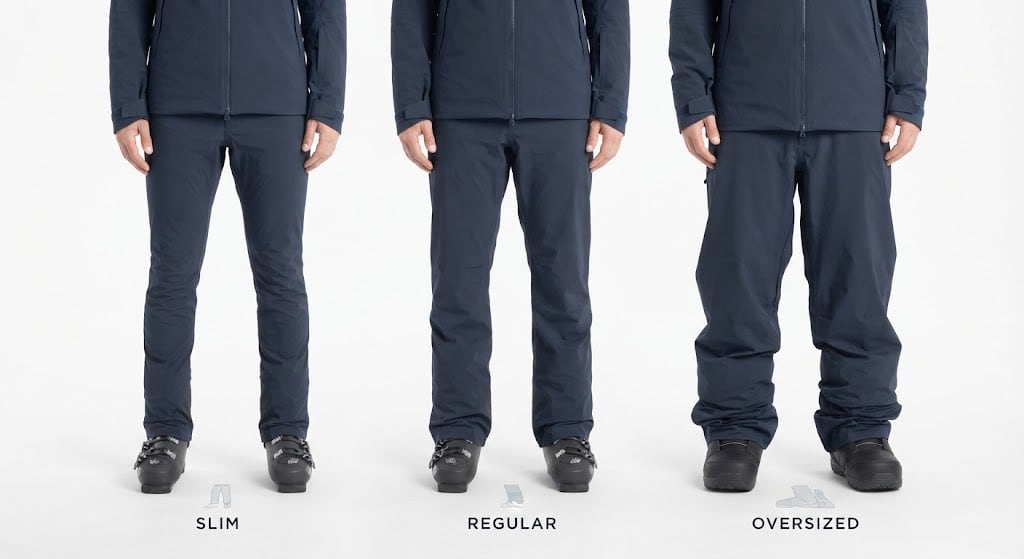
On cut there are three options, and none is better than the others:
- Regular: the balance, and what works for almost everyone.
- Slim: closer fitting. Common in alpine skiing and for anyone after a cleaner silhouette. Watch the layers underneath.
- Oversized: loose, the standard in snowboarding and freestyle. It gives freedom of movement and leaves plenty of room for protection.
Length is measured with your boot on: the hem should cover the boot on the outside and reach roughly halfway down it, without dragging on the ground — trousers that drag get stepped on and torn.
If you're going to wear protection underneath
A practical detail nobody tells you in the shop and that causes a fair amount of grief: impact shorts go under the trousers, and they take up room. If you buy trousers without allowing for them and then add the shorts, you'll be tight at the hips precisely on the day you fall most.
If you already know you'll be using them — and if you're starting snowboarding, you should be — try the trousers on with them, or allow some extra room. The same goes for knee pads. Which ones you actually need is in the protection guide.
What to look for in Sierra Nevada
Here trousers work harder than at other resorts, and the reason is the snow we have.
Sierra Nevada is the most southerly resort in Europe and gets a great deal of sun; spring starts in March, and from then on the snow freezes overnight and softens in the sun through the morning. Soft snow soaks you far more than dry snow, and trousers are the garment in most contact with it.
- Prioritise the water column over insulation. Here you get wet more often than you get cold.
- Thigh ventilation, close to mandatory in spring.
- Non-insulated with a base layer underneath on cold days: it's the most versatile choice for a season with this much variation.
- Bibs if you snowboard, given how long you'll spend sitting in wet snow.
You can check the snow conditions before you come to fine-tune what you bring.
Before you buy: a quick checklist
- Trousers for general use; bibs if you snowboard or sit in the snow a lot; a one-piece only for extreme cold.
- An inner gaiter with a boot hook. Without one, they aren't snow trousers.
- Edge-guard reinforcement on the inner face of the ankle.
- A water column equal to or greater than the jacket's, never lower.
- Ventilation zips on the thigh.
- An adjustable waist, and better still if it takes braces.
- Try them on with your boot on to check the length, and with your impact shorts if you'll be using them.
The short rule, if you take away one idea: look at the hems. A gaiter, a hook and edge-guard reinforcement cost little to manufacture, and many brands cut them from entry-level ranges — which makes them the best indicator of whether you're looking at genuine snow trousers or at waterproof trousers with a good photo.