

Boots, along with bindings, are the real link between your body and the board: every movement you make passes through them before it reaches the edge. Which is why a boot that doesn't hold ruins the performance of everything else — whatever board is underneath. This guide is about choosing well, about one very specific test that decides the fit, and about knowing when your boots are costing you control.
In short: measure your foot in Mondopoint and, above all, measure its circumference to work out your last width. Try boots on at the end of the day, in your real sock and done up, and check that your heel doesn't lift as you flex: that's the test that decides. They should feel tight in the shop, because the liner packs out with use.
The parts of a boot
Knowing them helps you understand what you're looking at when comparing two models.
- Liner: the inner part that moulds to your foot. It provides comfort, hold and insulation, and in many models it's heat mouldable.
- Shell: the visible outer part. It gives protection, stiffness and durability.
- Tongue: protects the instep and spreads pressure. Its stiffness directly influences the response.
- Cuff: determines the support and how much movement you have forwards and backwards while riding.
- Heel: a firm heel hold prevents your foot moving inside and improves control in every turn.
- Closure system: adjusts the pressure to keep your foot firm and stable.
- Sole: provides traction when walking and absorbs impact.
- Toe box: protects your toes and keeps the boot's shape. Usually reinforced.
Sizing: Mondopoint
It's the official sizing system in snowboarding, and its virtue is that it removes the confusion between European, US and UK sizes: Mondopoint is the actual length of your foot in centimetres. A 27.5 is a 27.5 cm foot.
How to measure: put a sheet of paper on the floor against the wall, place your heel against the wall and mark the tip of your longest toe. Measure the distance in centimetres and you have your size.
Do it at the end of the day, when your foot is slightly swollen, and measure both feet, because almost nobody's are identical: go with the larger.
What last width do I need?
Here's the figure almost nobody knows and that explains why two boots in the same Mondopoint can feel so different.
The last is the width and internal shape of the boot. Every foot is unique — wider, narrower, with a high or low instep — and if the last doesn't suit you, you lose precision and comfort however correct the length.
And the good news is you can measure it yourself: take a tape measure and measure the circumference of your foot at its widest point, right across the ball.
| Foot circumference | Your last |
|---|---|
| Under 23 cm | Narrow |
| Between 23 and 25 cm | Medium |
| Over 25 cm | Wide |
With that number you can rule out models before setting foot in a shop, which is exactly what saves you afternoons trying on boots that were never going to work.
Men's and women's boots
It isn't marketing: they're different designs because the shape of the foot and leg is different.
- Men's boots: a taller, stiffer cuff designed to support longer legs and feet, with a wider last and more internal volume.
- Women's boots: a lower cuff with a specific cut allowing a softer, more natural flex, with a narrower last and padding adapted to it.
Choosing the boot designed for your foot's shape isn't a question of the label: it improves fit, comfort and energy transmission in every movement.
The fit: the heel decides
Of everything to check on a boot, the most important is how it holds your heel and ankle.
A good fit improves edge control and prevents discomfort, blisters and fatigue. A heel that moves does the opposite, and it's behind almost every problem: blisters, instep pain from over-tightening in search of hold, loss of precision when loading the heel edge, and cold feet.
The four signs the fit is right:
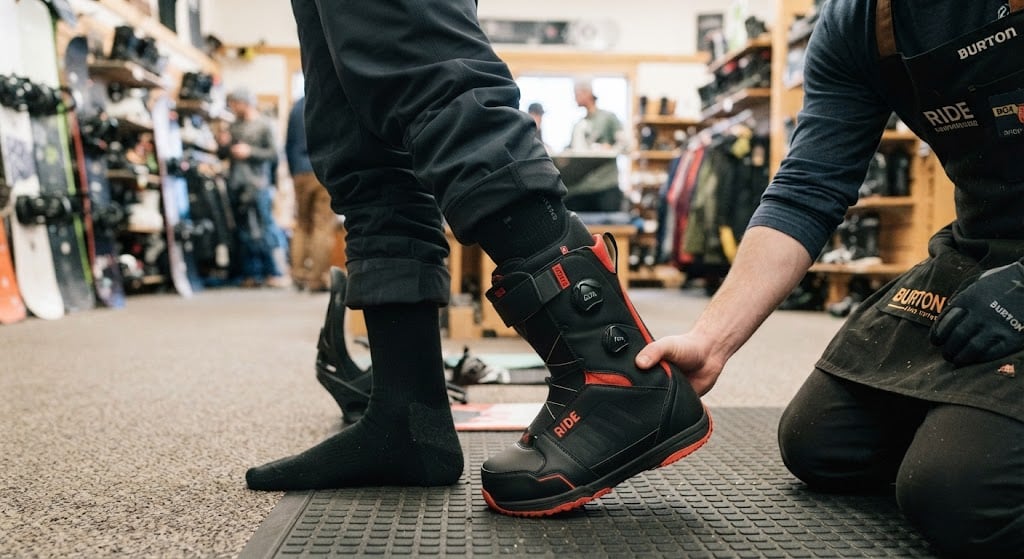
- Your heel doesn't lift when you flex your ankles. This is the test that decides.
- There are no pressure points cutting off circulation.
- Your toes brush the front standing up, and pull back slightly when you flex. That feeling of contact is hold, not lack of room.
- The closure system allows micro-adjustment, so you can fine-tune zone by zone.
They have to feel tight in the shop
This is the point that prevents the most grief and the one almost no guide mentions.
The liner compresses with use, and in snowboarding considerably more than in skiing because it's softer. A boot that feels "comfortable from the very first moment" in the shop will be clearly loose within a few days, and from then on there's no going back.
A well-chosen new boot feels snug and wrapped, even slightly uncomfortable, without hurting or numbing your toes. That margin is exactly what's going to pack out.
And an important warning, because it's a remedy that circulates widely: if the boot is too big, don't fix it with thicker socks. A thicker sock compresses your foot, restricts circulation and leaves your feet colder, and it doesn't solve the real problem, which is the heel lifting. We explain it in the socks guide. A better footbed can recover some volume; but the real solution is the right size.
Overhang: your boot and the width of your board
A detail that only exists in snowboarding and is worth checking before you buy.
With the boot mounted in the binding, the toe and heel should hang very little or not at all over the edge of the board. If they hang too far, when you tilt the board to turn the boot touches the snow before the edge does and puts you on the ground. That's toe drag, and it causes falls that seem inexplicable.
If you have big feet, this constrains the board as much as the boot: you may need a wide board. We cover it in the board guide.
Many brands now make boots with a reduced footprint: the same internal volume in a shorter outer shell, precisely to gain margin here.
Flex
The flex index measures the boot's stiffness on a scale of 1 to 10.
| Flex | Behaviour | Who it's for |
|---|---|---|
| 1 - 4 · Soft | Very comfortable, flexible and forgiving. They favour mobility. | Beginners and freestyle, where freedom of movement matters. |
| 5 - 7 · Medium | Good response without being demanding. | Intermediates and all terrain. A good starting point for carving. |
| 8 - 10 · Stiff | Maximum stiffness and immediate energy transmission. | Advanced carving, speed and technical conditions. |
The general rule: the stiffer they are, the faster and more precise the board's response, but the more technique you need to make use of it. A soft boot limits force transmission and loses precision when carving; a stiff one punishes mistakes.
Two caveats. Flex isn't standardised between brands, exactly as with boards: it works for comparing within a catalogue. And it's worth keeping the boot's flex in line with the board's and the bindings': a very soft boot with a stiff board wastes the board.
Closure systems
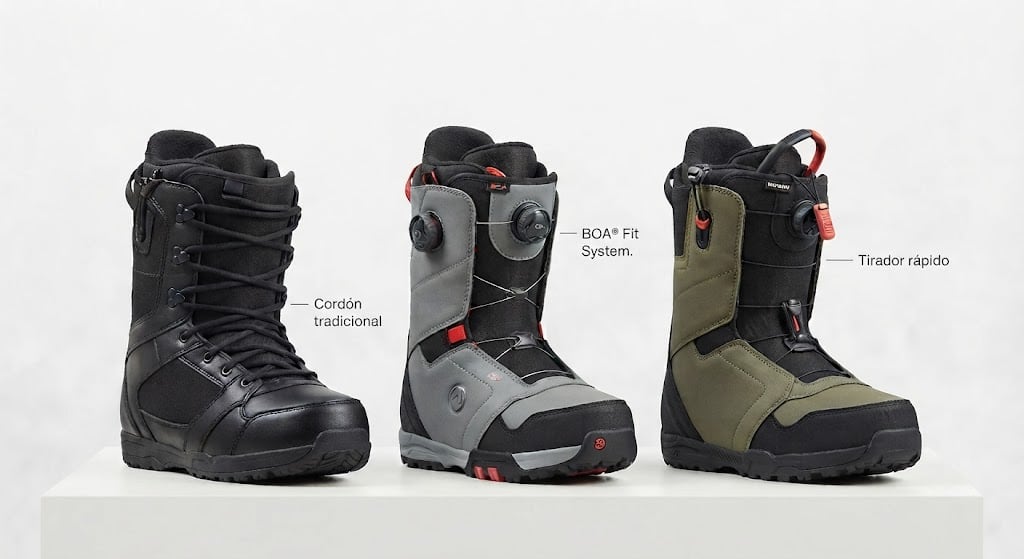
- Laces. Personalised adjustment and complete control over pressure, zone by zone, and dirt cheap to repair. In exchange they're slow to do up. A trick that works: cross the laces over each other twice before threading them through each hook. It generates more pressure and stops them loosening as the hours pass.
- BOA. A dial that tensions a steel cable: quick, precise and very even. Models with more than one dial adjust the instep, the cuff and even the liner independently, which is where you notice it most. It holds tension well through the day; in exchange it's more expensive.
- Quick-pull systems. Laces with one or two pulls that tighten in a single movement. Fast and very convenient, ideal for beginners and children, though the adjustment is less precise and tends to loosen.
- Velcro. The main system on children's boots, because it makes it far easier for them to put them on alone. On adult boots it appears at the top, as extra adjustment without undoing the whole boot.
- Hybrids. They combine systems by zone, for example BOA for the liner and laces for the shell. It's among the best-working setups today, because it lets you tighten differently top and bottom.
None of them makes up for the wrong size: choose size and last first, and the system afterwards.
Soles
- High-traction rubber: hard-wearing materials that grip well when walking. In their most demanding version, for technical terrain or ice, you'll find Vibram-type soles.
- EVA: a light foam that cushions impact and reduces fatigue, which you appreciate on long days.
- TPU (thermoplastic polyurethane): cushions and returns energy particularly well. It's the basis of Boost-type soles, and you notice it most on landings.
It's the part where least is at stake: any decent sole does the job. It matters more if you'll be walking a lot.
The liner and footbeds
The liner is the soft inner part and it's most of the boot: comfort, hold and insulation all live there.
Many are heat mouldable: they're warmed through a specific process in the shop and take the shape of your foot as they cool. It's usually included and very much worth having.
And there's one accessory that changes more than you'd expect: custom footbeds. They're worth it if you have a very high or very flat arch, if you get discomfort after several hours, or if you want more support and precision. They improve alignment, reduce pressure points and increase control over the board. The stock footbed in almost any boot is a shapeless piece of foam.
How to try them on, step by step
- In the socks you'll actually wear, thin and technical. Never two pairs.
- At the end of the day, with your foot already swollen: the test is more realistic.
- Always done up, adjusting the closure as if you were about to ride.
- Tap your heel back to settle your foot before closing.
- Check your toes: they should brush the front without pressing.
- Flex and check the heel: it shouldn't lift.
- Walk and move your ankles, simulating your riding stance.
- Note the overall feel: snug but comfortable, with no pressure points.
Boots for children
- Never a size up "so it lasts". With room to spare a child can't control the board, tires sooner and gets blisters.
- Soft flex, so they can flex the ankle with their weight.
- Velcro or a quick pull, so they can put them on and adjust them alone.
- Renting makes a great deal of sense while their foot grows every season.
We see it every week in the snowboard lessons: a child in an oversized boot isn't learning worse, they're fighting the gear.
Maintenance
Four routines and your boots will last far longer.
- Dry them daily. At the end of the day, take the liner out and let it dry at room temperature. No radiators, no hairdryers: direct heat deforms the materials.
- Store them lightly done up. Neither fully loose nor tight: that way they keep their natural shape and don't deform.
- Somewhere dry, ventilated and with no weight on them. Damp and heat are what damage a boot most off the snow.
- A pre-season check. A quick look over the general condition — closures, seams, sole, liner — saves you discovering a problem on day one.
Before you buy: a quick checklist
- Measure your Mondopoint at the end of the day, in your sock and going with the larger foot.
- Measure your foot's circumference across the ball too, to know your last.
- Try them on done up and flexing: the heel shouldn't lift.
- They should feel tight in the shop: the liner packs out with use.
- Check overhang with your board, or plan on a wide board.
- Flex in line with your board and bindings, and don't compare between brands.
- Make use of heat moulding and consider a moulded footbed.
- If they're too big, don't fix it with thick socks: change them.
If you have to split a budget, put it here before the board. And if you notice you're losing precision, that your foot moves, or that you keep tightening more in search of hold, it probably isn't your technique: it's the boots costing you control, and that's the moment to change them.