
Two jackets can advertise the same 20,000 mm water column and behave completely differently on a snowy day. The difference isn't in the big number on the label but in how the garment is built, and in a list of details that only jackets made for snow have: the powder skirt, the seams, the hood, the vents. This guide is about exactly that — what to look for in a specific jacket once you've got it in your hands.
In short: decide the type first — hardshell if you dress in layers, insulated if you want a single garment — look for at least 10,000 mm of water column and, above all, check four things you can see with your own eyes: that the seams are taped inside, that it has a powder skirt, that the hood goes over your helmet, and that it has zip vents under the arms. Those four details separate a snow jacket from a winter coat.
The jacket is your outer layer
Before anything else it's worth placing it: the jacket is the outer layer of a system of three, and its job is to stop water and wind without preventing the vapour from your sweat escaping. What you wear underneath — a base layer that moves moisture and a mid layer that insulates — does the rest.
That matters when buying, because it determines the type of jacket that suits you and the size you need. If the layer system isn't clear yet, or what Gore-Tex, water column or DWR mean, start with the guide to ski and snowboard clothing layers and come back afterwards: this guide takes all that as read and focuses on the garment.
Types of jacket
| Type | Has insulation | Who it's for |
|---|---|---|
| Hardshell | No | Anyone who dresses in layers and wants year-round versatility. |
| Insulated | Yes, built in | Anyone who'd rather have one garment and not think about it. |
| Softshell | No, and not waterproof | Cold, dry days, or as a mid layer. |
| 3-in-1 | Yes, zip-out | Anyone who wants one garment for the snow and for town. |
| Long or parka | Usually yes | Freestyle and snowboarding, for coverage and for style. |
| Ultralight | No | Touring and ski mountaineering, where weight rules. |
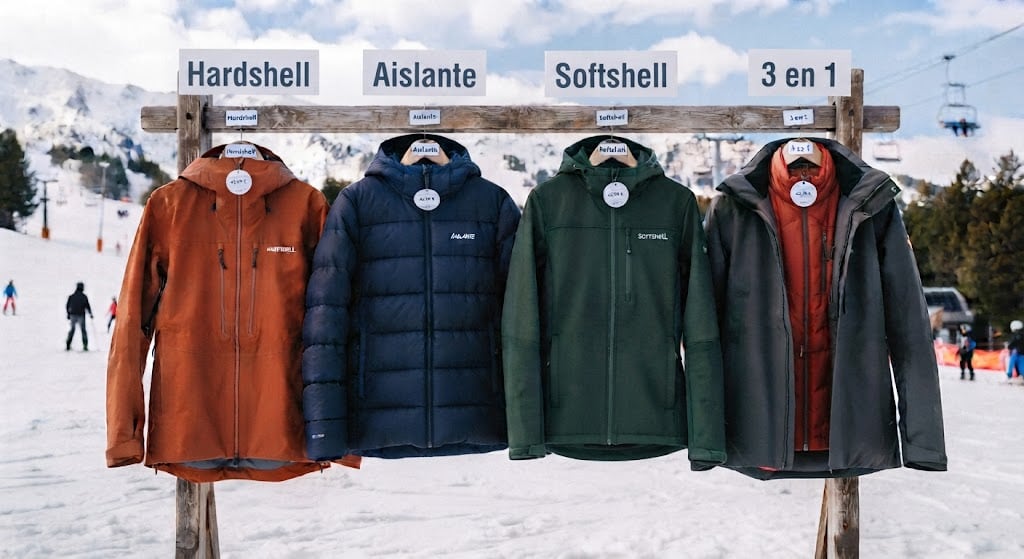
- Hardshell: the waterproof outer with no filling. It's the most versatile, because you decide how warm you are with the mid layer: the same jacket works for a January day at −8 °C and an April day at 10 °C. It's what we'd recommend to almost anyone skiing more than a couple of days a year.
- Insulated: the filling is stitched inside. More convenient — one garment and done — and usually cheaper overall, but you can't regulate: the day the temperature climbs, you've got too much jacket and there's nothing to be done.
- Softshell: comfortable and stretchy, it blocks wind and handles light water, but it isn't waterproof. As your only jacket on snow it falls short the moment it snows properly.
- 3-in-1: a waterproof outer plus a zip-out liner you can use separately. Very versatile on paper; in practice the liner tends to be weaker than a good mid layer bought separately, and the whole thing is bulkier.
- Long or parka: more coverage over your hips and thighs, welcome if you spend time sitting in the snow. Common in snowboarding and freestyle.
- Ultralight: designed for walking up. Just enough protection and not much durability for the day-to-day rubbing of piste skiing.
What does a 2, 2.5 or 3-layer jacket mean?
This is the difference that explains why two jackets with the same water column don't behave the same, and it's what almost nobody looks at.
Watch out for the name, because it invites confusion: these "layers" are not the three clothing layers. Here we're talking about how many films are bonded to the fabric of the jacket itself.
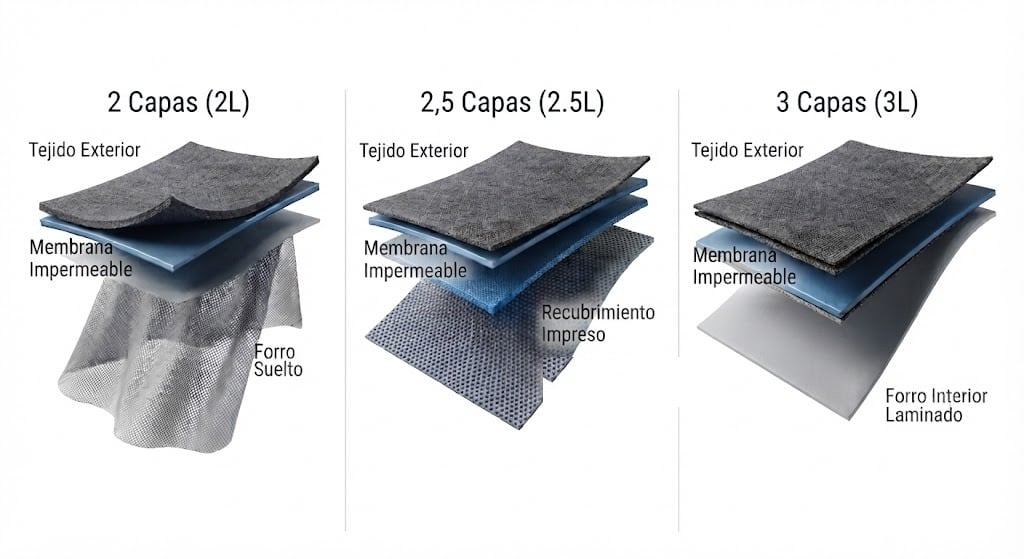
- 2 layers (2L): the membrane is laminated to the outer fabric and a loose lining hangs inside to protect it. It's the cheapest construction, but it's heavier and bulkier, and usually breathes slightly less.
- 2.5 layers (2.5L): the membrane is bonded to the outer and there's a printed coating inside instead of a lining. Very light and packable, ideal when weight rules; in exchange it's the least durable and the least pleasant against skin.
- 3 layers (3L): the membrane is encapsulated between the outer fabric and a laminated inner lining, all in one fabric. It's the most durable and performs best in hard conditions, and it's also the most expensive.
For skiing on piste, a good-quality 2L or 2.5L is more than enough. 3L pays off if you go off-piste a lot, use it heavily, or want it to last for years.
The seams: where the water gets in
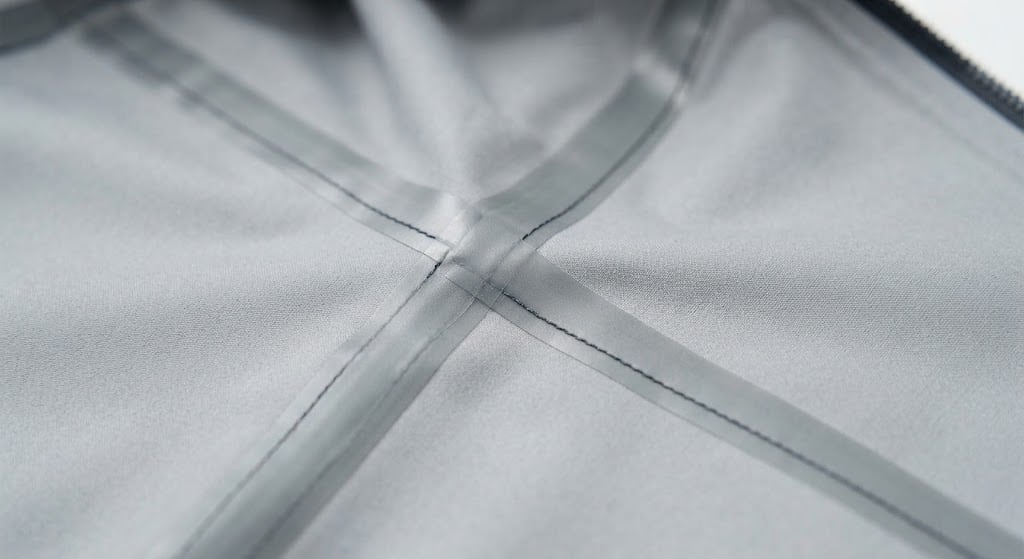
A waterproof membrane is no use at all if water comes through the needle holes. That's why seams are sealed on the inside with heat-bonded tape.
There's a common misunderstanding to clear up here: "taped" and "heat-taped" are not two different quality levels. Heat taping is the method used to seal them. The distinction that does matter, and that you'll see on product sheets, is a different one:
- Critically taped: only the most exposed seams are sealed — shoulders, hood, collar, chest. It's standard in mid-range jackets and usually enough for piste.
- Fully taped: every seam in the garment is sealed. That's what you need if you'll be out for hours under snowfall or sitting in the snow.
You can check it by eye: turn the jacket inside out and look for tape over the seams, and over which ones.
The details only a snow jacket has
This is what separates a technical jacket from a waterproof town coat, and what you genuinely notice on a day on the hill.
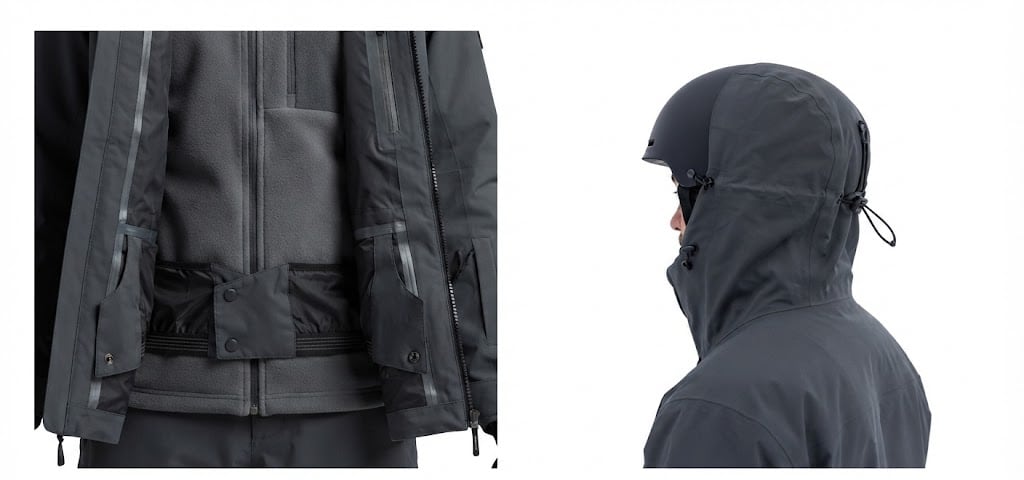
- Powder skirt: the elastic band inside that fastens around your waist and stops snow riding up under the jacket when you fall. In snowboarding, where you sit in the snow constantly, it's close to mandatory. Detachable is a bonus.
- Helmet-compatible hood: it has to go over the helmet, not under it. Try it with your helmet on, because a normal hood doesn't stretch enough and ends up pulling at your neck.
- Zip vents: under the arms, sometimes with mesh. It's the fastest way there is to regulate your temperature, far quicker than any membrane. If you're torn between two jackets, take the one that has them.
- Lift pass pocket on the sleeve: it sounds trivial until you go through a gate with your gloves on.
- An inner goggle pocket, lined with soft fabric, which stops you scratching the lens when you stow them at lunch. If keeping them in good shape matters to you, we cover it in the goggles guide.
- Inner cuffs with a thumb hole: they seal your wrist and stop snow getting in up the sleeve, especially if your glove has a short cuff.
- Reinforcement on shoulders, elbows and hems, where the garment rubs most against snow and against gear.
RECCO: what it is and, above all, what it isn't
Many jackets have a small RECCO reflector sewn inside. It's a passive reflector: no batteries, nothing to switch on, and it works by returning the signal from a detector operated by the resort's rescue teams.
And here's the important warning, the same one we give in the helmet guide: RECCO is not avalanche safety equipment and it replaces nothing. It only works if there's a team with a detector looking for you, and in practice it's mostly used in later search operations. If you go off-piste, what you need is a transceiver, shovel and probe, and the training to use them. Having RECCO in your jacket is a free extra; relying on it would be a serious mistake.
Size and cut
This is where most people get it wrong, and the mistake always goes the same way: buying the size you'd take in a town coat.
- Try it on with your layers, or at least with a fleece. A jacket that fits perfectly over a T-shirt will pinch on the mountain, and a tight garment compresses the insulation and keeps you less warm.
- Raise your arms above your head. If the jacket rides up and exposes your waist, it's too short: on snow you'll be raising your arms constantly.
- Check the adjusters: cuffs, hem and hood. Good adjustment makes up for a size that isn't exact.
- Length is a style and a sport decision. Snowboarding and freestyle go longer, for coverage when sitting; alpine skiing tends towards a trimmer cut.
Which jacket for Sierra Nevada
Sierra Nevada is the most southerly resort in Europe and gets a great deal of sun, and spring starts here in March: the snow freezes overnight and softens through the morning. That shifts the priorities compared with what a guide written for the Alps would tell you.
- Hardshell over insulated. With days that go from −5 °C first thing to shirtsleeves at midday, being able to shed the mid layer is worth more than carrying a lot of filling.
- Vents, close to mandatory. A sunny March morning will genuinely make you sweat.
- Genuinely good waterproofing, because soft snow soaks you far more than dry snow.
- A powder skirt if you snowboard, for the same reason.
You can check the snow conditions in Sierra Nevada before you pack to fine-tune what you bring.
Care and when to replace it
Wash it with a detergent made for technical garments, never normal detergent or fabric softener, and reactivate the water-repellent treatment when water stops beading on the outside. Most jackets that have "stopped being waterproof" have simply worn through their DWR and can be brought back; the full process is in the layering guide.
Genuinely replace it when the fabric is worn through, the seam tape starts lifting inside, or the membrane is cracked. That's the part that can't be fixed.
Before you buy: a quick checklist
- Hardshell if you dress in layers; insulated only if you'd rather have one garment and not regulate.
- From 10,000 mm of water column, and with underarm vents.
- Look at the construction: 2L or 2.5L for piste, 3L if you're going to work it hard.
- Inside out: check whether the seams are taped, and whether all of them or only the critical ones.
- A powder skirt, especially for snowboarding.
- Try the hood with your helmet on, not by eye.
- Try the jacket on with a fleece underneath and raise your arms.
- RECCO is fine to have; but off-piste what you need is a transceiver, shovel and probe.
In the end, between two similarly priced jackets, the better one is almost never the one advertising the biggest number: it's the one with properly taped seams, a powder skirt, a hood that goes over your helmet and vents. Those four details take two minutes to check in the shop and they're the ones you'll be grateful for at three in the afternoon on a snowy day.