
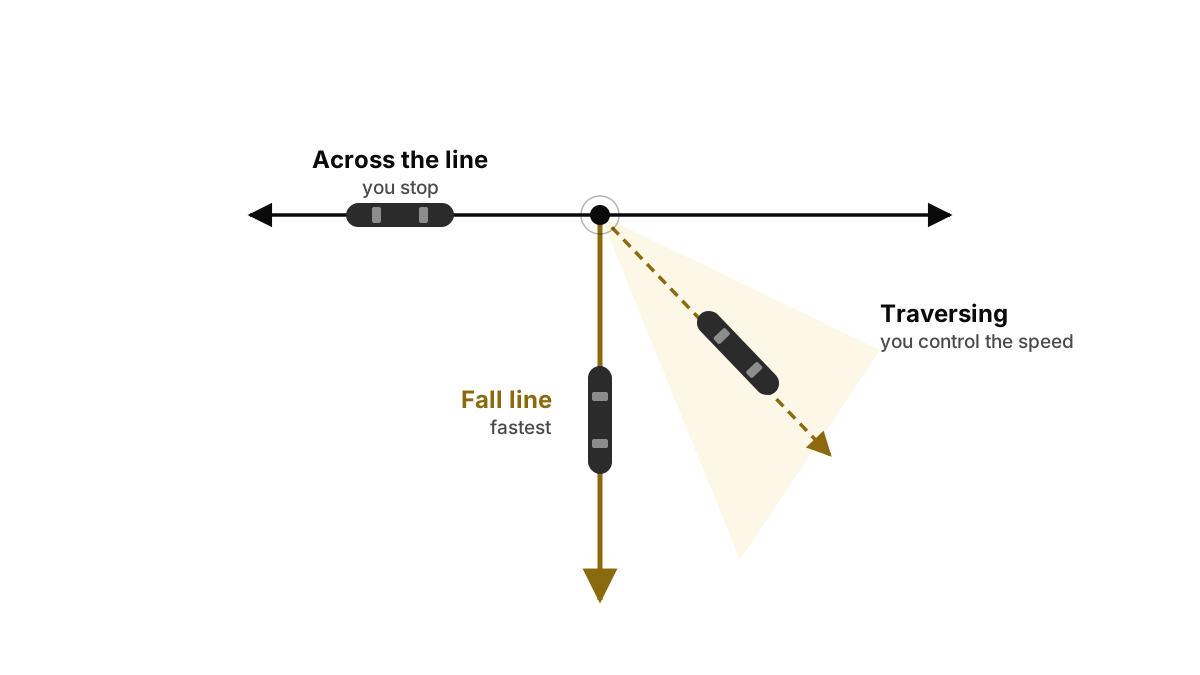
There is one idea that, once it clicks, puts almost everything that comes later on a snowboard in order: stopping, controlling your speed, sideslipping, starting a turn, changing edge. It is called the fall line, and it is worth understanding before you ride down your first slope.
How to see it
If you dropped a ball at the exact spot where you are standing, the path it would take is the fall line.
That is all it is. Nothing is drawn on the snow: it is a mental reference, but it is the one that tells you in advance what your board is about to do.
It is not always the same
If the slope changes direction or steepness, the fall line changes with it. The line you have at one point can be a different one a few metres further down.
This explains something that happens to everyone: you have your speed nicely under control, the piste curves slightly, and suddenly you are going faster without having done anything differently. And you haven't done anything differently — the slope underneath you changed.
That is why you don't read it once at the top. You keep reading it as you go.
What happens depending on where your board points
| Board position | What happens |
|---|---|
| Along the line | Board flat. This is the direction where you gain the most speed |
| Across the line | You cut right through it. You stop: this is the position where you come to a halt |
| Traversing | Everything in between. You regulate: faster as you point nearer the line, slower as you point nearer across it |
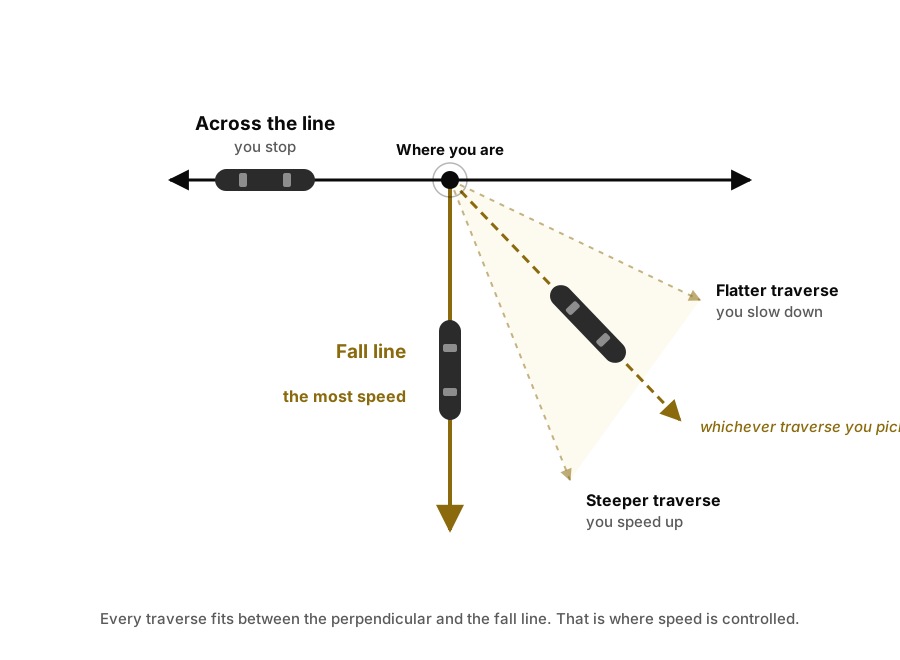
Put another way: you brake with the angle. How hard you push matters far less than where the board is pointing.
The traverse is where you spend most of your time. Across the line is not just one more position: it is the end of the road, the place where you come to a complete stop.
The flat board, and why it isn't optional
Of the three, pointing along the line has something worth knowing from day one: it is the only one where the board is flat, not sitting on either edge. And it isn't just one more option on the menu.
Every time you change edge you go through it. To get from one edge to the other, the board has to pass through the point where it is on neither — and that point is precisely the fastest one.
That is why the moment you accelerate most and the moment you change edge are the same moment. It is the part that feels most intimidating at first, and the one you have to learn to cross decisively rather than hesitantly: the longer you take over it, the more speed you pick up.
How to train your eye
You don't need a board for this. In fact it is better learnt without one, on day one, before you strap in.
- Stand on the slope and look around. Work out where a ball would roll if you let go of it. That is your line.
- Walk twenty metres and do it again. Check whether it has changed. On a curving piste, it changes a lot.
- Watch the people riding down. You will see that the fast ones have the board pointing close to the line, and the slow ones have it across. It isn't luck and it isn't ability: it is angle.
- Then, strapped in and stopped on an edge, turn your body slowly and feel how everything changes as you point nearer to that direction or further from it.
Five minutes, and they save you a lot of frights.
The hardest thing to get at first: confusing "steep" with "fast". A steep piste ridden across the line can be perfectly calm, and a gentle piste ridden pointing downhill will have you going faster than you want. What decides your speed is not how steep the slope is, but where your board points within it.
How to know you have understood it
- You can point to the fall line anywhere on a piste.
- You notice it change when the piste changes, without anyone telling you.
- You can explain why you are speeding up, instead of feeling that the mountain is speeding you up.
- You understand that to stop you have to cut across, not push harder.
- You know that changing edge means going through the flat, and that the flat is where you accelerate most.
This, in a first lesson
In a first snowboard lesson, the fall line is the first thing we work on, before you even strap in.
- The first few minutes, standing on the slope, learning to read which way the ground falls away.
- Then, strapped in and stopped on an edge, feeling how everything changes depending on how you point it.
- And the rest of the day actually using it: to stop, to choose your way down, and to make speed something you decide rather than something that happens to you.
What an article can't give you is the correction at the exact moment you get it wrong. That is what shortens the learning curve: not learning faster, but not repeating the same mistake for three days.
An instructor sees what you can't: that your board is ten degrees lower than you think, or that you are looking at your board instead of the piste. Request your lesson and we'll work on it the first day.
What comes next
With this reference clear, the order of the progression stops being arbitrary:
- First we learn to stop on the two fundamental edges: backside and frontside.
- Then we use traverses to control speed and to move around the piste, sideslipping.
- And finally, to make our first turns, which are nothing more than going from one edge to the other across this line.
Changing edge, linking turns, choosing your way down: all of them are, underneath, different ways of relating to the same line. Which is why it pays to have it settled before moving on.
You understand it by reading. You absorb it on the snow. The difference is having someone behind you saying "right now you are pointing here" at the exact moment you are getting it wrong.
If you are coming to Sierra Nevada and you are just starting out, request your lesson: tell us which days you are up here and we'll tell you what you need. The request doesn't commit you to anything — we call you and work it out together. If you would rather see what kinds of lesson there are first, they are all on snowboard lessons.